How to Build a DIY Bowling Ball Rack: A Step-by-Step Guide
Are you looking for a fun and creative way to store your bowling balls? Building your own bowling ball rack is a great way to show off your skills and add a unique touch to your home. With a few simple tools and materials, you can easily build a DIY bowling ball rack that will last for years. Here’s a step-by-step guide to help you get started. Step 1: Gather Your Materials Before you start building your bowling ball rack, you’ll need to gather the necessary materials. You’ll need two pieces of wood, screws, a drill, and a saw. You can use any type of wood you like, but make sure it’s strong enough to hold the weight of the bowling balls. Step 2: Cut the Wood Once you have your materials, it’s time to start building. Start by cutting the wood into two pieces. The first piece should be slightly larger than the second piece. This will be the base of your rack.| Product | Stainless Steel Dish Rack | Item No.IKEM11319 | finish | Electrochemistry |
| CLOLUR | Silver/Customize | Material Stainless Steel+ PP | Size | 47*30.5*15 CM(18.5*12*5.9 inch) |
| divelttime | 25days | Use Dish and Bowl | product time | 2023.04.20 |
| Functional design: | Multifunction | Product name: | o | Stainless steel Dish Rack 2 |
| d | Dish Rack Stainless Steel | d | Material: | stainless steel |
| Package: | poly bag+color box+outer carton | style | Modern | Size:50*33*14.5CM |
 And there you have it! You’ve just built your own DIY bowling ball rack. With a few simple tools and materials, you can easily create a unique and stylish storage solution for your bowling balls. So get creative and have fun!
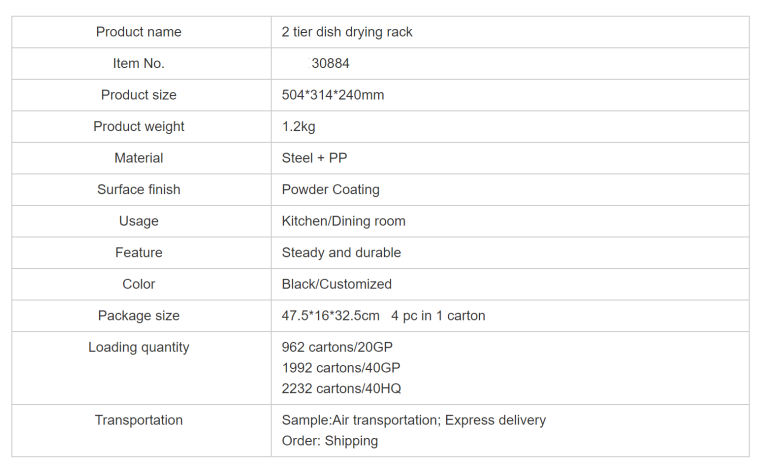
黑白喷塑单层-85-768x988.jpg)